How To Use Sign In With Ethereum And NFTs To Build A Token Gated Instagram
Using Next.js and Pinata

If you’ve ever connected your Ethereum wallet to a website or web app, then you’ve surely felt the frustration of session management—or lack thereof. When connecting to a site, you are generally prompted to sign a message proving you control the wallet in question. However, as soon as you reload the page, close the browser, or close your laptop lid, you are, for all intents and purposes, signed out. This is session management and it’s a solved problem in web2. However, web3 is still catching up.
This is where Sign In With Ethereum (SIWE) comes in. SIWE is an open standard that takes message signing to the next level. When implemented, apps can authenticate a user based on a signed message, but they can also implement session handling to ensure the person stays signed in for whatever time the app specifies. Again, this is a well-known pattern with traditional apps, but it’s been a frustrating missed requirement in web3.
When we built Submarine.me and showcased signing messages to prove ownership of NFTs, we ran into some of the limitations of traditional message signing and lack of session management. So, we decided to explore what SIWE would look like alongside Pinata’s Submarine feature.
Today, we’re going to build a simple web app that allows users to Sign In With Ethereum. It will check to see if the user owns a particular NFT. If the NFT is owned, the session should last one hour (but you can set this to whatever you’d like). Users will be able to upload images that can be displayed in a member’s only gallery where other members can like the photo.
This is a technical tutorial. If you’d prefer a no-code solution to NFT-gated media, checkout Submarine.me from Pinata.
Getting Started
This app will make use of Pinata’s paid plan features. You can get started for as little as $20/month and get access to Dedicated Gateways, Submarining, Custom Domains, and more.
We are going to use Next.js for the app because it gives us a unified frontend and backend with serverless functions. So, dust off your JavaScript skills.
You’ll need to have Node.js version 12.22 or later.
I will provide CLI commands to get our app set up, but feel free to dig into the Next.js docs for alternative installation solutions. OK, let’s get started.
From the command line, run the following:
npx create-next-app members-only-photos
If you’re prompted to install create-next-app enter y and proceed. This will then kick off the process of creating a new Next.js app for you. Once the process is complete, you’ll need to change into the new directory with your app:
cd members-only-photos
Open your app’s directory in your favorite code editor, and we’ll get started. Your directory structure should look something like this:

Notice we have a folder called api? This is where our server-side routes will be housed. Anything not in that api folder will be considered a client-side page in the app. So, we have an index.js file that will act as our home page. Let’s remove the boilerplate code in that file and replace it with this:
It’s not styled, but it’s a starting point. If you run npm run dev in the terminal, you can fire up the Next.js app and see it running at http://localhost:3000.
Ok, I think it’s time to move on to the SIWE work.
Sign In With Ethereum
Because we’re using Next.js (which leverages server-side rendering), we’re going to need to install some additional dependencies alongside our SIWE dependency. One of the dependencies will be for session management, and one of them will be for convenience.
In your terminal, run the following:
npm i siwe next-auth wagmiThis will install the Typescript library for SIWE, it will install a session management framework for Next.js called next-auth, and it will install a convenience library for managing Ethereum transactions and signing called WAGMI.
If you happen to have a React version mis-match between your project and any of the libraries, you can add the --force command to the end of your install command to force the install through anyway.
Now, we need some environment variables for use on the server-side parts of this project. Environment variables are just regular old variables that are stored at a global level. In the case of server-side environment variables, they are also secret and not ever exposed to the client (browser).
In the root of your project, add a .env.local file. This file will already be gitignored but it’s always good to double check your .gitignore file to be sure. If you don’t see .env.local in there, add it to be safe.
In your .env.local file, add the following:
NEXTAUTH_SECRET=somereallysecretsecret
JWT_SECRET=itshouldbealsoverysecret
DOMAIN=localhost:3000
You’ll want to replace both NEXTAUTH_SECRET and JWT_SECRET with two secret passwords or strings of text that you choose. They should be sufficiently random and sufficiently unguessable. This github thread on JWT secrets suggests using a password manager to generate your secrets, which is what I’ll do for my project.
Now, we can make use of these libraries. In the pages folder, find the file called _app.js. This is the entry point to the entire application. We’re going to replace all the code in that file with this:
Now, we get to play with our API routes. Remember there’s a folder within the pages directory called api. We’re going to create another folder within the api folder itself. Call this new folder auth. Then, we’re going to create a file in that folder called [...nextauth].js.
I know that file name looks weird, but this is how Next.js handles dynamic routing on API routes. You can read more about that here.
So, to be clear, your directory structure for the api folder should look like this:
-api
  -auth
    -[...nextauth].js
Once you have that set, add the following code to your [...nextauth].js file:
Let’s talk about what’s happening in this file. We have both the GET and POST methods for the API route covered. In the GET method, we are essentially creating a message to be signed using the SIWE framework. We use our JWT and our NEXTAUTH_SECRET to help create a unique message that can’t be replayed.
In the POST method, we are validating the signature and the nonce (the unique identifier that helps prevent those replay attacks mentioned in the linked article above. Assuming the signature is valid, a session token is returned to the client.
Let’s make sure the frontend can handle this authentication API. Back in your pages/index.js file, update everything a bit to look like this:
We kept our same button and text on the page, but we wired that button up to make use of the new API route we created. Let’s break this down a bit.
First, we have a new session hook that we’re using to track the user’s authenticated session. If there is a session, we shouldn’t show the log in screen, so we push the user over to our gallery page (more on that soon). If there is no session, the user needs to sign in.
When the Sign In With Ethereum button is pressed, the handleLogin function is called. That function uses the wagmi library’s connect function to connect to your wallet provider. A message is then created that needs to be signed by the user’s wallet. At first glance, it looks like this message is created entirely on the client, but it’s not. Take a look at the await getCsfrToken() call in the nonce portion of the message. That is using next/auth which automatically knows the API route to hit and leverages the GET request we setup on our API previously to return the token.
With that token, we can sign the message. Then, once again using the next/auth library, we can make a signIn request. This hits our API’s POST method. There, the signature is validated, the nonce is checked, and if everything is good to go, a new session is created.
There is a callback URL that we provide as part of that request. That can be used to redirect the user to a specific page after the request succeeds. However, we’re just waiting for the response, checking that the URL is included (meaning the sign-in was valid), then using next/router to push to the /gallery route in the app.
Go ahead and give it a shot. Assuming everything works correctly, you will sign a message then be redirected to http://localhost:3000/gallery. You’ll get a 404 there, but we’ll fix that soon.
Let’s tl;dr this whole thing. We set up a button that lets a user sign a message with their Ethereum wallet. That signature is verified and creates an authenticated session. All very cool.
But we’re missing something.
We’re supposed to also be checking if the user has a specific NFT. Let’s take care of that.
Checking For NFT Ownership
We’ve covered this topic in the past, but it’s worth going over again. Once we’ve verified that the signature is valid, we can then trust the wallet address associated with that signature. That means we can now check if that wallet owns the NFT we expect it to own.
Because we’re using SIWE and next-auth, we don’t need a separate API route to check on the NFT ownership. The API route we set up already checks on existing sessions, so we simply need to make sure the NFT is owned initially and then if the session is valid, we can assume the NFT is still owned. Of course, someone could sell the NFT during a valid session, but the time period in which that NFT is no longer owned and when the session expires is controlled by you.
When the user first signs in with Ethereum, an authorize function is called on our API. Let’s update that function to check for ownership of an NFT we specify. We’re making an assumption here that the NFT info will be hard-coded. Update this logic as needed.
Our first step is to update the authorize function in the pages/api/auth/[...nextauth].js route like this:
We’ve added a variable is set from the response to the function validateNFTOwnership. That variable is then included in the session data. It’s a simply true/false variable but you can add whatever data to it you want.
Let’s now write the validateNFTOwnership function.
At the top of your pages/api/auth/[...nextauth].js file, above the export statement, add this function:
We have a couple of new things to cover here. First, we’re going to need to install the Ethers.js library. To do so, run the following command from your terminal:
npm i ethersWhen that’s done, be sure to import it at the top of your API route file like this:
import { ethers } from "ethers";Then, we will make use of Alchemy to connect to an Ethereum node and enable our access to read smart contracts. Alchemy has a generous free plan you can make use of. You’ll need to create a project and you will generate an HTTP URL to use. That URL includes your Alchemy key, so we want to keep it private. Add the URL to your .env.local file with the name ALCHEMY_ENDPOINT.
Next, we will need the contract address for the NFT we want to check for. In this example, we are assuming it’s an ERC721 contract.
Finally, we need the ABI for the ERC721 standard. You can get this from a variety of places, but we have an example in the Submarine.me app’s github repository here. You’ll want to bring that into your code however you feel comfortable. In my example, I have a helpers folder with an erc721.js file that includes the ABI and exports it.
The validateNFTOwnership function uses those ingredients to check to see if the wallet address in question owns the NFT we’re looking for. If so, the function returns true. Otherwise, it returns false.
If the user doesn’t own the NFT, the session is not valid and a 401 response code is returned to the client. However, if the user does own the NFT, they are logged in and stay logged in until the session is expired or until the session is manually invalidated.
We now have a working authentication system that combines SIWE and NFT ownership. Give it a shot yourself. Make sure to update the NFT smart contract address to that of an NFT project from which you own an NFT. You’ll be redirected to the gallery page.
Let’s create our gallery.
Creating The Gallery
If you remember, any folder or file nested under the pages directory in a Next.js project (besides the api folder) becomes a page in your app. So, we need to create a new file in the pages folder called gallery.js. Once you’ve done that, add the following boilerplate code:
We’re once again checking for a session on this page. If there is not one, we render a button to go back and sign in. If there is a session, we have some placeholder to load files and we set our loading indicator back to false.
Let’s talk about how we’re going to manage the files for this app. What do we need to do:
- Authenticate users based on NFTs (done)
- Allow users to view gallery of images that other holders have uploaded
- Allow users to upload their own images
These images need to only be served if the user owns the NFT in question. And the user should only be able to post new images if they own the NFT in question. Thankfully, we’ve solved all of that with SIWE and next-auth. Now, we can focus on uploading images using Pinata.
We don’t want these images to be public, so we’re going to make use of Pinata Submarine. We will need to take a client-side upload, pass it over to our Next.js serverless backend, and then upload the file to Pinata Submarine. To get started with this, you’ll need a paid plan account on Pinata. You can sign up for $20/month here.
Once you’ve signed up, you’ll need to create a Dedicated Gateway. This is how you will serve all of your images and the metadata about these images. You can follow this guide. Once you’ve done that, you’ll need to generate an API key. You can do so by clicking the avatar dropdown menu in the top-right, then clicking V2 API Keys. V2 in this case really just means it’s for Pinata Submarine only. On the API Keys page, generate a new API key.
We will need to protect that key, so let’s add it to the .env.local file with the name SUBMARINE_KEY. If you update your .env.local file, you’ll need to stop your dev server (ctrl + c in the terminal) and then start it back up with npm run dev.
Now, we need a media endpoint for our API so that we can both request and post new images. Let’s add that by creating a file in the pages/api folder called media.js. Let’s build out the start of our API for fetching media. Add the following:
We have stubbed out the POST request method, but right now we’re focusing on the GET requests. In the GET request, you can see we are once again making use of the next-auth library to check on our user’s session. We don’t want to enable access without ensuring they are signed in.
Next, we are making a request to the Pinata Submarine API. That request includes a query for metadata. Pinata Submarine’s API allows us to associate private files with metadata keyvalue pairs to help us find the content easier. In this case, we are using a UUID is hard-coded on the backend. In a production app, you can use any mechanism you’d like to identify the correct Submarined files.
The result of this request will include information about the actual file we want to fetch. Remember that this content is Submarined, meaning we’ll need to generate an access token to load it. So, if you check out line 30, you can see that we’re checking to see if we have any matches for an index file. If so, we grab the first item in the array. This should always be the most recent, and if we are deleting old indexes, then it would be the only item in the array. We then get the ID and CID and generate an access token.
For this to work, you’ll need a Dedicated Gateway from Pinata. We talked about this earlier, but if you didn’t create one, go do it now. Once done, update your .env.local file to include a property called GATEWAY_URL and point that to the new gateway URL you just created.
Restart your server, and let’s keep going.
We haven’t stored any files, but let’s connect the frontend code so that it can make the request for our index file of members-only photos when those photos are available. In your gallery.js file, update the code to look like this:
Since we’re using a useEffect hook to make our request to the media API route, and since we are only doing so if the session object has data, we need to take care to ensure the API call is only made once. Quick reminder about useEffect: it will fire every time state changes for variables in the dependency array. In this case, our useEffect hook is dependent on the session variable. That variable starts out null as we have an asynchronous call made to check on session state. As soon as it comes back with data, the variable is updated, and useEffect is called again. To prevent duplicate API calls, we will only make the request id the session variable object contains data that we know indicates a logged in session.
Now, if you check the console.log for the data we retrieved from the Submarine API, it should look something like this:

As expected, we don’t have any data yet. But we have enough info to set a state variable. There are many ways to manage state in React and with Next.js. For the sake of this tutorial, we’re going to keep it as simple as possible and just use React’s built-in useState hook.
What happens when we do have data? Remember, each image is Submarined. So, we will need to generate an access token for each. We’ll need a process that does this and updates state with a fresh URL for each image so that our gallery can be displayed. In a production application, you’d want to include some form of pagination as well, but we’re going to keep this to a small example with no pagination.
In the gallery.js file, below the loadFiles function, create a new function called getUrls. The updated file will look like this:
Ok, to be fair, we updated more than just a new function in the file. Let’s walk through this all.
First, there is a new state variable called imageUrls. Next, in the loadFiles function, we call our new getUrls function and we pass in the index array. Then, in the getUrls function, we are making a request for each file in the index file array to get a gateway URL with an access token so we can load the image. Finally, the rendered component itself is updated to include a gallery view. I added some classes to style the gallery just a bit, but you don’t need to worry about that right now.
The endpoint we are calling to get the image URLs with access token doesn’t exist yet, so let’s create it. In the pages/api folder, add a new file called accessToken.js. Then in that file, add the following:
Much like we did in our media endpoint, we are checking on the user’s session, then we are generating an access token for the file ID provided. Finally, we are returning a URL that can be directly passed into our img element on the frontend.
If you refresh the page at localhost:3000/gallery, you’ll see that…nothing changes. We still haven’t added any photos. Let’s make it easy for members to add photos to the gallery.
Adding Photos To The Gallery
We’ve created the gallery, but it’s empty. We can change that by letting authenticated users upload photos to the gallery.
Let’s update the gallery.js file to look like this:
I know it looks like a lot, but really, we just added a file upload handler and a screen to show the upload process. We have logic powered by state variables to check if the page is loading, if the user should be on the upload view, or if they should be on the gallery view.
Our input element allows images only. The onChange function captures the file info that is still at the client level and waiting to be posted to the server. Finally, the upload function posts the image to the server.
If you remember, we stubbed out the media endpoint’s POST function. It’s time to fill that in. That means we’re going to need a few more dependencies installed. From the command line, run the following from the root of your project:
npm i form-data formidableWhen that’s done, at the top of your pages/api/media.js file, add the following imports:
import formidable from "formidable";
import fs from "fs";
import FormData from "form-data"
I’ve refactored the whole page a bit and added in the post functionality, so let’s revisit the entire file:
Because we will need to get the index file multiple times, I pulled the code out to do that into its own function. You’ll also note that there’s a config function at the tip of the file that’s exported. This is there to allow the formidable library and Next.js to play nicely together.
Let’s take a closer look at the POST method of our API route here. We, of course, check for a valid session. Then, we use formidable to parse the multipart-formdata that we uploaded from the client. With thin the parse function, we call the saveFile function, passing in the files element which was extracted from the form parsing.
The saveFile function then creates a read stream that can be used to post to the Submarine API. The file is Submarined, then we make a request to get the index file. We update the index file with info about the newly submarined image, and then we save the index file again.
You’ll notice this API doesn’t have a DELETE route. You could implement this in much the same way as the POST route is implemented, but I’ll leave that up to your creative mind.
If we go back to our gallery page in the app, click the upload button, select an image, and then upload, everything should work!
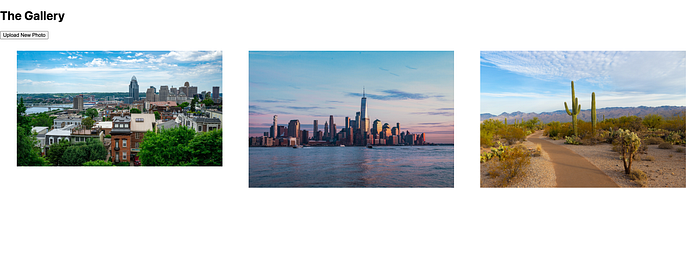
Wrapping Up
It could use some styling, but it’s working. What you’re seeing is essentially an NFT gated version of Instagram using private IPFS (Pinata Submarine) and Sign In With Ethereum.
Since we’re using a simple index file stored as JSON and made private with Pinata Submarine, you could extend this further and add commenting, likes, and more. With this template, communities can be built to be more interactive, more participatory, and more exciting.
If you’d like to see the full source code for this app, you can find it here. And as always, if you liked this tutorial, be sure to check out our other tutorials and sign up for Pinata today.